Re-approaching the Project Euler Problems: Uh-oh

This all happened one quiet Friday evening.

I was at my laptop happily working away on my new system for tackling the Project Euler problems, and had just got both PHP and JavaScript playing nicely with the Python script (one of many) that I had created, which takes all the data of the language, version, machine specs (OS, memory, that sort of thing). Success! Naturally I had written scripts in each of the 3 languages to tackle – where else to start? Problem 1.

Problem 1 asks you to find the sum of all the multiples of 3 or 5 below 1000, of course for this project I am taking it a bit further and finding the sum of all said multiples below x, but it defaults to 1000 if no value of x is provided.

When I hit enter on the JavaScript file for the first successful time my heart leapt with joy as it reported no errors. Then just as quickly that joy turned to suspicion, “that answer looks different to the one Python has been giving me, oh please don’t be”.

Now it doesn’t take a particularly keen eye to spot that something has gone very wrong with at least 2 of these, they’re not even just a little bit out from each other, the JavaScript one is over 100,000 more than the next highest, PHP! The question now is, which one is right? Or even, are they all wrong?

This could well mean that all the data I have been collecting thus far is useless. I mean, what good is knowing how long it took a particular script to give you the wrong answer?

And here I was thinking I’d get away without automated testing! *Sigh* yet another bit to add! One of these days I might actually start solving the problems themselves!

The much older and wiser Gavin from 20 minutes in the future: Get away without automated testing? What on earth were you thinking, Gavin? You go ahead and do what you want but I’m going to bed 💤.

Re-approaching the Project Euler Problems – an Introduction

Avid readers of this blog (of which I’m sure there are many, I mean, there are 14 whole posts on here at the time of writing!) will remember that back in 2019 I started solving the Project Euler Problems, I set myself the task of solving 1 problem a week, writing a bit about it, and posting it every Sunday at 3PM without fail.

Needless to say, I failed. The few posts that did manage to see the light of day are now available under the project euler 2019 tag in all their glory. I started doing the first few in PHP then switched to Python, then wondered why I shouldn’t do them all in both of those languages, then thought about other languages such as JavaScript, C, Rust and C++, then tried to build all sorts of tools to help me manage all of this. Plus how would I store the code to display it? It took me quite a while to settle on Gists which with hindsight really should have been my first port of call. Can I really be sure I’ll be at my desk at 3PM on a Sunday every week for 749 weeks? No, of course I can’t, I’d better automate that part. 749 weeks is just under 14 and a half years. Meaning that if I had kept up with it from the latter half of 2019, it would run to about the end of 2033. My 28-year-old self would then be 42, my newborn infant would be about to start his GCSEs, you see where this is going, it’s a commitment. One way to combat this is to construct some tools around it to help automate it – as well as adding a few supplementary features – such as:

  • First of all, I want to make sure my code works, so automatic compilers for the languages that need compilation. These will also need to be tailored to the platform I happen to be running them on, especially given that back in 2019 I only had a clunky old laptop running Ubuntu. I now still have that same laptop, but also a much newer, smaller, Windows laptop, and now a MacBook from my new job. On the plus side this does now give me all 3 of Linux, MacOS and Windows!
    • I wonder if there’s a way to get these running on Android/iOS as well! Maybe save that for another day.
  • A tool to turn Markdown posts into nicely-formatted blog posts suitable for WordPress.
  • A way to automate their publishing for 3PM each Sunday – this is actually the easy part, just write them ahead of time and set their publish dates accordingly. Then again, who’s to say I won’t decide to alter this?
  • A tool to upload my code files into Gists (as well as maintaining the whole thing as a Git repo anyway).
    • This one is quite troublesome because at the time of writing my way of making sure a Gist for a given problem and language doesn’t already exist is a bit hit-and-miss.
  • A WordPress block to pull down all the Gists relating to the problem being viewed.
    • This has the same issue, however, as my Gist-uploading tool above. When I was going through the posts to add the project euler 2019 tag, problem 1 believed I’d only written it in C++ and Java!
  • A way to manage and maintain all of this, including making updates where necessary.
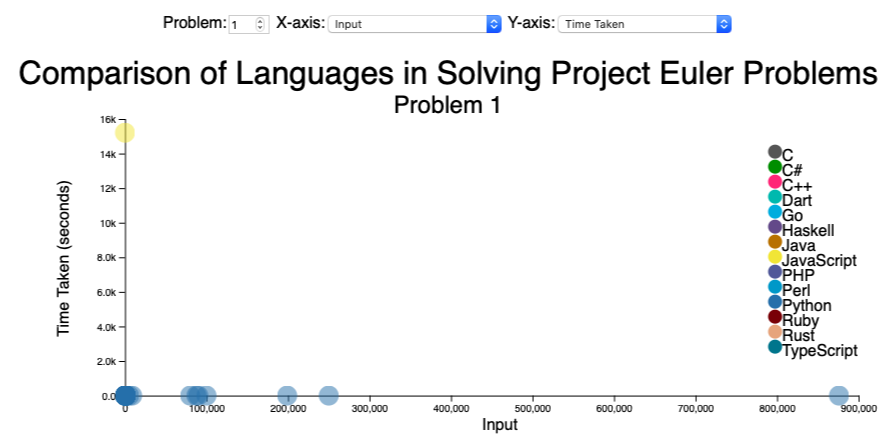
  • Additional feature: It would be nice to include a D3-based scatter plot of how long each language takes to solve each problem given different input values. This in itself is a huge data collection project, meaning I need to store the language, values, results, time taken and machine specs in a CSV for each problem. The latest version of the design for this can be seen on VizHub, and treat yourself to a screenshot below! This may give some insights beyond just “which languages are faster?” such as “does a particular language work better on a certain machine?”, “how do various language cope with higher inputs?” And so on.
Example screenshot of what each scatter plot will look like.
Example screenshot of what each scatter plot will look like, subject to change as it is still in development. Oh and that JavaScript outlier isn’t real data in case you were wondering!

So where to even begin with all this? Well, luckily, I’m writing this partway through getting my system built up, so I already have something of an idea of what to do. One thing I have noticed copied across multiple files (most of this automation is being done in Python) is a duplication of the dictionary containing the language names and file extensions. It would be good to get a comprehensive list of the ones I’ll be working on in a separate file wouldn’t it? Luckily I have found this Gist from Peter Pisarczyk (in turned forked from Aymen Mouelhi) which contains what appears to be just about every programming language ever. I haven’t gone through the whole list but I reckon it’s a fairly safe bet that I haven’t even heard of more than half of them!

This then results in the following languages.json file – I never knew there were this many file extensions in the known universe!:

At each step I’ll be looking to see what our basic folder structure looks like, so at the moment:

project-euler
├get_working_language_extensions.py
â””working_language_extensions.json

Now as an example, let’s look at what I want each problem folder to look like:

project-euler
├problem_x
│├problem_x_timings.csv // To store the info of how long each problem took to solve, also store the input value, language, and machine specs
│├problem_x.c
│├problem_x.cpp
│├problem_x.java
│├problem_x.js
│├problem_x.md // To be converted into the relevant blog post
│├problem_x.php
│├problem_x.py
│├problem_x.rs
│└problem_x.ts
├get_working_language_extensions.py
â””working_language_extensions.json

And for completeness and to allow me to make my next post in this series but still chronologically after this (albeit not by much), without leaving this one looking a bit short, here is the full file list (for now at least!) Along with a brief explanation, there will of course be full posts explaining these in due course!

project-euler
├problem_x
│├problem_x_timings.csv // To store the info of how long each problem took to solve, also store the input value, language, and machine specs
│├problem_x.c
│├problem_x.cpp
│├problem_x.java
│├problem_x.js
│├problem_x.md // To be converted into the relevant blog post
│├problem_x.php
│├problem_x.py
│├problem_x.rs
│└problem_x.ts
├.gitignore // (obviously!)
├c_functions.c // Functions to be imported into C scripts, not sure yet but this may need to be .h, once I dive properly into C I'll find out!
├cpp_functions.cpp // Functions to be imported into C# scripts
├env_info.json // gitignored as it's machine specific
├file_operations.py // All file-related operations
├file_templates.py // Templates for files in each language, hopefully to prepopulate imports, boilerplate, etc. in each folder
├get_env.py // Run this to creat env_info.json above
├github_config.py // Generated tokens for working with my Gists
├github_credentials.json // gitignored as these are the API keys for github_config to use! 
├java_functions.java
├js_functions.js
├languages.json // Renamed from working_language_extensions.json in the code block above
├languages.py // Renamed from get_working_language_extensions.py in the code block above
├mkdirs.py // Create all the directories for each problem, may merge this into file_operations.py
├php_functions.php
├problem_descriptions.json // I created this to allow the chart I'm designing to pull down a subtitle, may change how I do this
├publish_to_wordpress.py
├publish.py // A lot of duplicate code between these two, but the idea is that this automates creating the blog posts
├pyfuncs.py
├README.md
├rust_functions.rs
├ts_functions.ts
├updategists.py // Functions for working with Gists
├wp_config.py // Much like github_config.py but for WordPress
â””wp_credentials.json // Again, like github_credentials, gitignored as these are keys

Creating a setter function in JavaScript Objects

As part of one of my projects I have had a central object called "layout" with it being to do with manipulating SVGs, and as part of that I decided it would be easier to write said layout object such that it has a getter and setter function, so that:

layout.item.points.X = 20;

…becomes:

layout.set('item.points.X',20);

…much more verbose and much more functional, I’m sure you’ll agree!

So first, the getter function, well, this couldn’t be easier really:

const layout = {
  get: function() {
    return this;
  },
  set: // To be confirmed
  /* All other properties */
}

But now, what about the setter? Well, that’s where it gets a bit more complicated. First, we need to take the propChain and newState from the user:

const layout = {
  set: function(propChain,newState) {}
}

I have written it so that it follows the usual object notation, as per the example above, so if you want to set item’s pointX value to 20 you give it layout.set('item.points.X',20).

First of all, let’s prevent the user from being able to change either the setter or getter:

const layout = {
  set: function(propChain,newState) {
    if (['get','set'].includes(propChain)) {
      console.warn(`🛑 What are you doing? Should you really be changing either of these functions? `);
      return;
    }
  }
}

And get our function to exit if the propChain is empty:

const layout = {
  set: function(propChain,newState) {
    if (['get','set'].includes(propChain)) {
      console.warn(`🛑 What are you doing? Should you really be changing either of these functions? `);
      return;
    }
    if (!propChain) return;
  }
}

Now for the fun bit! We want to split our propChain into sections and:

  • Check for the first property on our original object, and create it if it isn’t there
  • If it is there (which it now is) check if we’re at the end of the provided chain
  • If we are, set the property to equal the given newState
  • If not, go one level further into the object (having just created the new property) and repeat from step 1
const layout = {
  set: function(propChain,newState) {
    if (['get','set'].includes(propChain)) {
      console.warn(`🛑 What are you doing? Should you really be changing either of these functions? `);
      return;
    }
    if (!propChain) return;
    propChain.split('.').reduce((original/*Object*/,prop,level/*how deep we are into the chain*/) => {},this);
  }
}

So, um, what?

Let’s go through it bit-by-bit.

We use the split function to split propChain from a string into an array, using . as the breaking point (just how you’d access an object property in JavaScript anyway) on which we can now use the reduce function.

The reduce function is immensely powerful and I’m often guilty of discarding it in favour of map because I’m more comfortable there.

The reduce function takes up to 4 parameters (read more on MDN) but we’re only interested in the first 3: the accumulated value, the current value and the current index, which we’re calling original, prop and level.

const layout = {
  set: function(propChain,newState) {
    if (['get','set'].includes(propChain)) {
      console.warn(`🛑 What are you doing? Should you really be changing either of these functions? `);
      return;
    }
    if (!propChain) return;
    propChain.split('.').reduce((original,prop,level) => {
      // Firstly, check if our original object has the property, and add it if not.
      if (!(prop in original)) {
        original[prop] = {}; // Why a blank object? In case we go deeper into the chain and need to add properties to this, which you can't on undefined, 0 or an empty string
      }
    },this);
  }
}

Could I not have used original.hasOwnProperty(prop)? In JavaScript yes but in TypeScript the linter shouts at you: Do not access Object.prototype method 'hasOwnProperty' from target object no-prototype-builtins.

const layout = {
  set: function(propChain,newState) {
    if (['get','set'].includes(propChain)) {
      console.warn(`🛑 What are you doing? Should you really be changing either of these functions? `);
      return;
    }
    if (!propChain) return;
    propChain.split('.').reduce((original,prop,level) => {
      if (!(prop in original)) {
        original[prop] = {};
      }
      // Now check if we're at the end of our given chain and if we are, set the property to the given newState
      if (level === propChain.split('.').length - 1 /*Remember, indexing starts at 0*/) {
        original[prop] = newState;
      }
      // Now return our object, and that's it!
      return original[prop];
    },this);
  }
}

Finally we arrive at:

const layout = {
  get: function() {
    return this;
  },
  set: function(propChain,newState) {
    if (['get','set'].includes(propChain)) {
      console.warn(`🛑 What are you doing? Should you really be changing either of these functions? `);
      return;
    }
    if (!propChain) return;
    propChain.split('.').reduce((original,prop,level) => {
      if (!(prop in original)) {
        original[prop] = {};
      }
      if (level === propChain.split('.').length - 1) {
        original[prop] = newState;
      }
      return original[prop];
    },this);
  }
}

Or, in TypeScript:

interface LayoutObject extends Record<string, unknown> {
  get: () => LayoutObject;
  set: (
    propChain: string,
    newState: Record<string, unknown> | string | number
  ) => void;
  // All the rest of our properties
}

// TypeScript uses interfaces to define, well, almost everything!

const layout: LayoutObject = {
  get: function (): LayoutObject {
    return this;
  },
  set: function (
    propChain: string,
    newState: Record<string, unknown> | string | number
  ): void {
    if (['get', 'set'].includes(propChain)) {
      console.warn(
        `🛑 What are you doing? Should you really be changing either of these functions?`
      );
      return;
    }
    if (!propChain) return;
    propChain.split('.').reduce((original, prop, level) => {
      if (!(prop in original)) {
        original[prop] = {};
      }
      if (level === propChain.split('.').length - 1) {
        original[prop] = newState;
      }
      return original[prop];
    }, this);
  },
  // All the rest of the properties
}

Randomising Flex Order of Items

This all stems from a random conversation this week, where a colleague was fiddling with the layout of our new website. She essentially wanted a row of vendor logos to display, but in the era of responsive web design, not cram 8 of them onto a mobile screen, and not use 3 of them to fill up a laptop, so our initial idea was to simply use media queries to hide/show certain ones.

Not bad, but not brilliant, it just seems a bit static and there’s too much chopping and changing, we could do with it being a bit more fluid. That’s when she came up with these 2 brilliant lines of code that got rid of the need for any media queries at all!:

.logos-container {
  /* other styles such as display: flex; and flex-flow: row wrap; */
  height: same-as-logos-height; /* They're all png files set to the same height */
  overflow: hidden;
}

So that’s the cramming issue sorted, and all these logos can now be displayed on a large screen, with only 2 or 3 of them on a mobile. But now there’s another problem:

A mobile user will only ever see the first 2 or 3 logos that are in the markup, and may never see the rest of the vendors we work with!

Kate: “It would be good to be able to randomise these.”

Me: “Well there’s flex-order that can change the order of how things appear no matter where they are in the markup, so I reckon that would be the answer. Randomising though? I’m not sure CSS can do that.”

Enter JavaScript.

Me: “I promise you, there is a way to do this and I will find that way.”

Me a few days later: “Here it is!”:

See the Pen Randomising Flex Order of Items by Gavin Sykes (@gavinsykesuk) on CodePen.

This was also my first step into using either a CSS or HTML preprocessor. I’d always viewed these tools in the past with a “well, what’s the point?” attitude, but have started slowly warming to them. Certainly, HAML’s ability to do for loops and create a lot of divs without having to change x lines of code to tweak them all slightly I found very helpful. Plus, change one number and you get more or fewer items, no mass deletion and no copying and pasting multiple times! SCSS is also another string to the bow, and I believe its ability to manage large-scale projects may well come in useful in the future.

Cross-posted on dev.to

Append a Child to an SVG Element in Pure JavaScript

Why write a blog post about this, Gavin? Well it turns out that appending a child to an SVG, or within an SVG group, isn’t as simple as it would be if we were working with plain HTML.

I’m sure there are good reasons for this, but part of me would really like to know what those reasons are! I imagine they will be something to do with SVGs being written in XML rather than HTML. That, however, is research for another day, unless someone reading this knows the answer in which case all comments are welcome.

Well, why not just use jQuery or D3? They both have an append function and it works just fine.

They do indeed, however, for this particular project I want something that ships as light as possible, and as light and as powerful as jQuery and D3 are, it would still mean downloading an entire library just for the sake of appending elements to an SVG, whereas this entire project (so far) has 21 lines of JavaScript.

Fear not though, because if you’ve ever tried the below code:

let newElement = document.createElement('rect');
newElement.setAttribute('fill','orange');
newElement.setAttribute('width','200');
newElement.setAttribute('height','200');
document.getElementById('svg-drawing').appendChild(newElement);

Only for nothing to appear, despite it appearing in the DOM (which really does call into question what those good reasons could possibly be), then look no further, I have the solution.

To really work properly with SVGs we have to enter the world of namespaces. Indeed, this is exactly what jQuery and D3 do. By making one small change to our code we can make it work as it should, observe below:

let newElement = document.createElementNS('http://www.w3.org/2000/svg','rect');
newElement.setAttribute('fill','orange');
newElement.setAttribute('width','200');
newElement.setAttribute('height','200');
document.getElementById('svg-drawing').appendChild(newElement);

Now, the differences under the hood between createElementNS and createElement, I couldn’t tell you, though it’s clear that it somehow tells the browser it is creating an SVG rectangle element, rather than just a rectangle element to go, um, somewhere else, somehow, I guess.

And that’s basically it! I’ve taken the liberty of writing a helpful function to append on object to SVG, as I’m sure you won’t want to be typing, or even copying and pasting, that URL each time.

const appendSVGChild = (element,target,attributes = {},text = '') => {
  let e = document.createElementNS('http://www.w3.org/2000/svg',element);
  Object.entries(attributes).map(a => e.setAttribute(a[0],a[1]));
  if (text) {
    e.textContent = text;
  }
  target.appendChild(e);
  return e;
};

// If applying attributes, they need to be in the format {'attr':'val','attr2':'val2',...}

Thoughts? Comments? Improvements? Improvements especially welcome as I’m sure there are some to be made!

Cross-posted on Dev.to